ELAN Connector: Import Gaze Annotations
This tutorial shows how to import human-annotated gaze data from ELAN to use as ground truth for evaluating NICE Toolbox detector outputs.
1. What is ELAN?
ELAN (EUDICO Linguistic Annotator) is a free annotation tool developed at the Max Planck Institute for Psycholinguistics. It is widely used in linguistics, psychology, and behavioral research for frame-accurate annotation of audio and video recordings. Download it for Linux, macOS, or Windows at https://archive.mpi.nl/tla/elan/download — no license required.
ELAN organizes annotations into tiers — named tracks that run along a shared video timeline. Each tier holds a sequence of intervals, where each interval has a start time, an end time, and a text label. Multiple tiers run in parallel, so each subject and behavior gets its own track.
In this tutorial, we use ELAN to label gaze interaction — whether each person is looking at their conversational partner or looking away. This produces frame-by-frame ground truth that can be compared against the NICE Toolbox gaze detector to measure its accuracy.
2. Prerequisites
ELAN installed on your machine.
A video file of your session to annotate.
The ELAN connector itself requires no additional installation — it is part of the standard NICE Toolbox environment.
Throughout this tutorial we use the communication_multiview example dataset. If you haven’t set it up yet, follow the Getting Started guide first.
3. Prepare and export your annotations
Open the example project
The communication_multiview example dataset includes a ready-made ELAN annotation file. Open it in ELAN via File → Open:
<datasets_folder_path>/communication_multiview/annotations_raw/gaze_elan/sequence_xyz.eaf
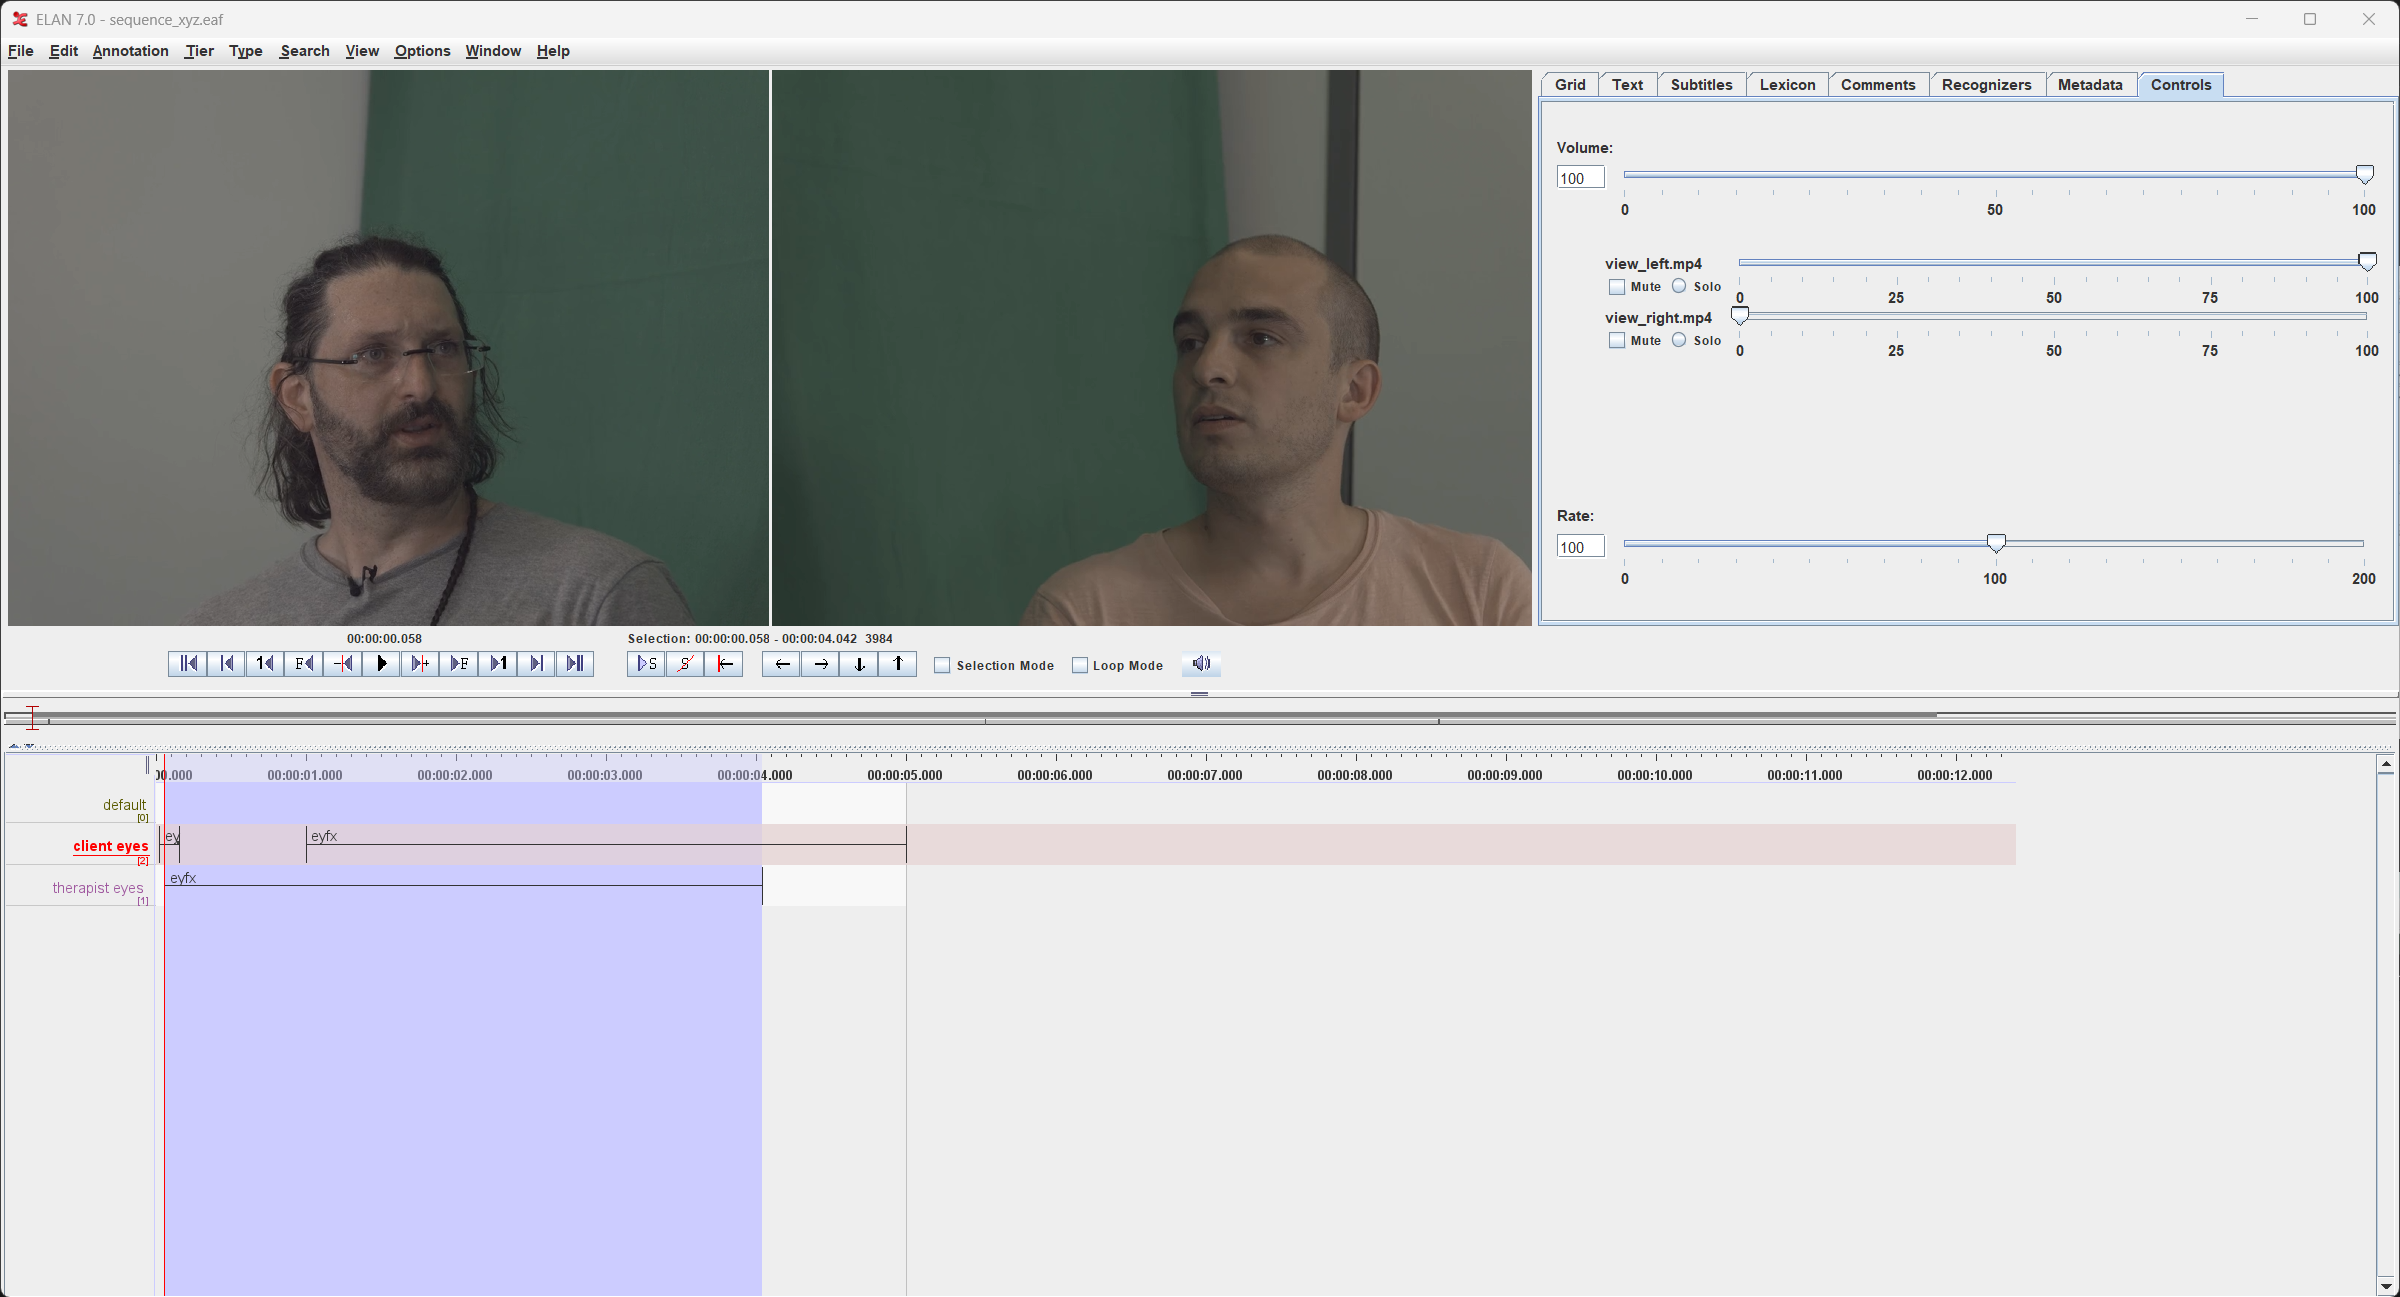
This opens the annotation alongside the two face-camera videos. You will see two tiers in the timeline — client eyes and therapist eyes — one for each participant.
If you are starting a new annotation from scratch, create the tiers via Tier → Add New Tier, naming them <subject_id> eyes for each participant.
Tier naming and labels
Each subject needs one tier named <subject_id> eyes (e.g. client eyes, therapist eyes). The subject ID is the prefix before the space — it is what you will map to a toolbox name in the config later.
For each interval, use one of the two recognized labels:
Label |
Meaning |
|---|---|
|
Looking at the other person (fixed gaze) |
|
Gaze averted / not looking at partner |
Intervals with no label are treated as gaps — you can configure a default label to fill them (see Labeling categories).
The final result of the labeling will looks something like this:
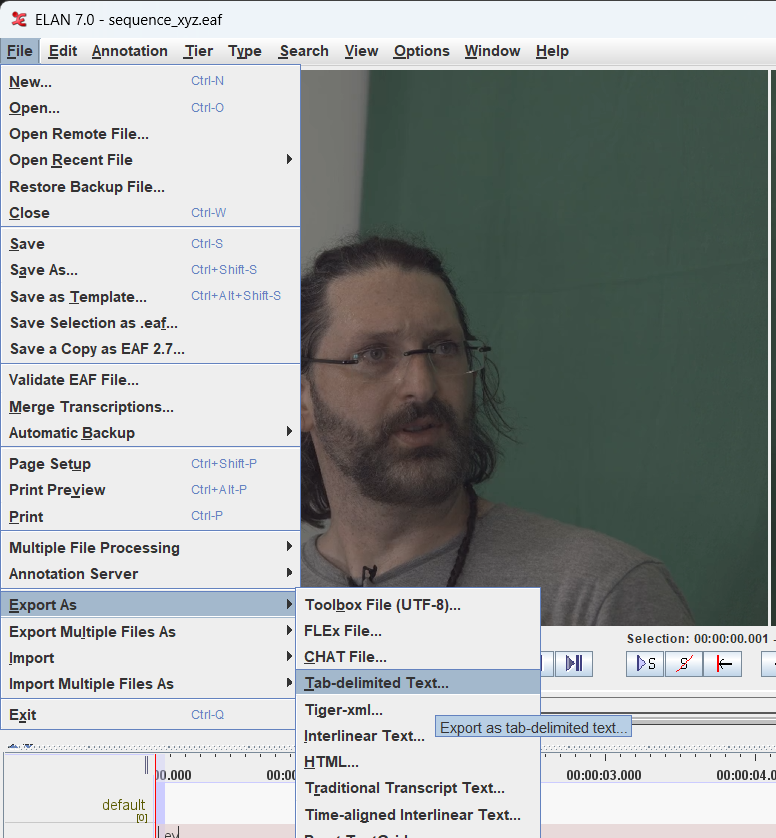
Export as tab-delimited text
Once your annotation is complete, go to File → Export As → Tab-delimited Text:
In the export dialog, make sure:
Both
client eyesandtherapist eyestiers are checked under By Tier Names.Include header lines containing media file information is checked — this embeds the FPS and duration metadata that the connector uses for validation.
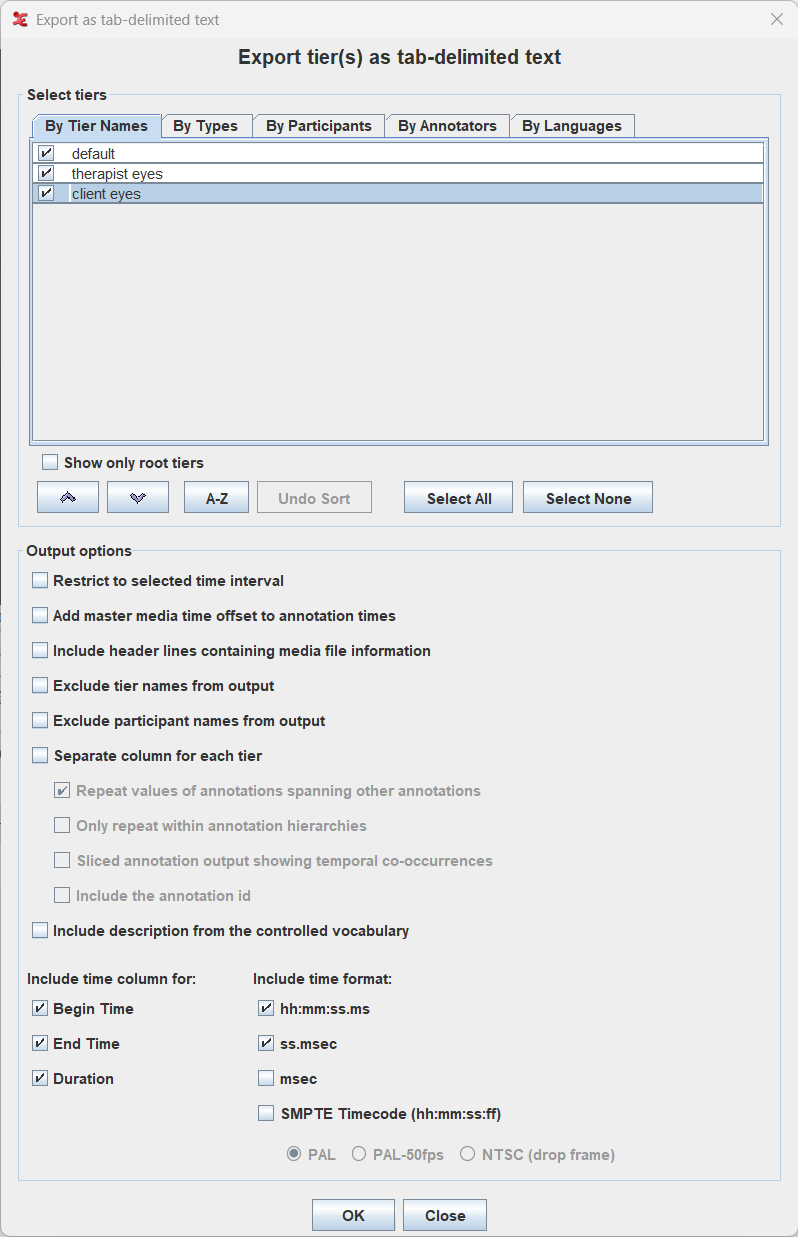
Click OK. The resulting .txt file is what you pass as input in the run config.
4. Configure the connector
The connector is driven by a single TOML config file. A template is provided at configs/connectors/elan_import_gaze.toml.
Sequence settings
Each sequence is a table under [run.<sequence_id>]:
[run.sequence_xyz]
input        = "<dataset_folder>/annotations_raw/gaze_elan/sequence_xyz.txt"
output       = "<elan_output>/sequence_xyz_gaze.npz"
video        = "<dataset_folder>/sequence_xyz/view_top.mp4"
start        = 0       # from first frame
end          = -1      # until the end
reset_frames = true    # keep the frames order
Field |
Description |
|---|---|
|
Path to the ELAN |
|
Where to save the output |
|
Video file — used to read FPS and validate alignment with ELAN header |
|
Time window to extract, as |
|
If |
You can define multiple sequences in the same config file by adding more [run.<sequence_id>] tables.
Subject mapping
The [subjects] table maps ELAN tier subject IDs to toolbox subject names:
[subjects]
client   = "person_left"
therapist = "person_right"
The keys are the subject prefixes used in your ELAN tier names (e.g. client in client eyes). The values become the subject labels in the output NPZ.
5. Run the connector
Activate your NICE Toolbox environment and run:
# Linux
source ./envs/nicetoolbox/bin/activate

# Windows
envs\nicetoolbox\Scripts\activate

# Run the connector
elan_connector import_gaze
Progress and validation messages are printed to the console and written to the log file defined in the config.
6. Use the output for evaluation
The connector’s primary use case is producing ground-truth annotation files that can be compared against NICE Toolbox detector outputs in the evaluation pipeline.
Once you have a gaze.npz from the connector, point the evaluation config at it as the ground-truth source. For example, in configs/evaluation_config.toml:
[metrics.gaze_accuracy]
metric_type   = "accuracy"
predictions   = { component = "gaze_individual", npz_key = "gaze_look_at_3d" }
ground_truth  = { path = "<output_folder_path>/connectors/elan_import/sequence_xyz_gaze.npz", npz_key = "gaze_look_at_3d" }
Before running the evaluation, make sure you have a completed detector run to compare against. If you haven’t done that yet, run the detectors first (see Getting Started):
run_detectors
Then run the evaluation:
run_evaluation
The results are saved to the folder defined in evaluation_config.toml under output_folder. See Tutorial 5 for a full walkthrough of the evaluation pipeline.